Posts Tagged: Jon N – UK
Motobécane Rodeocycle Owner’s Manual
Max Skatebike Generations – How to Tell Them Apart
Max skatebikes are great fun but finding the right one means knowing what to look for when buying one. There are essentially three editions of Max skatebike and I’ll try to cover the differences between them all. As I’ve not been able to find any confirmed dates of manufacture I am making an educated guess for the dates, if you know of when the different editions were produced or the quantities then by all means get in touch.
-

- First edition rear wheel mounting is larger and square shaped

-

- Second/third edition with a narrower and more rectangular wheel mount

-

- The two frame are essentially the same shape from a distance

-

- Side by side comparison highlights they share the same size down tube

-

- Side by side chainstay comparison shows how the first edition tapers off earlier than the second/third edition

-

- The second/third edition is more streamlined and simple than the first edition

-

- The two bottom bracket shells

-

- Top down view of the bottom bracket shells

-

- The skateboard truck mounting plates from above

-

- Note the difference in sizes and hole spacing

-

- The first edition seat tube with additional hole at the side

The frame in primer grey is what I believe to be the first edition Max skatebike and created in the mid-1980’s. The main features to note for this model are that the mounting plate for the skateboard truck has the standard ‘old school’ hole spacing, the bottom bracket shell is smaller than the other two editions, the chainstay section is a slightly different shape to the later two editions and at the top of the seat tube there is a hole in the frame that is not present on the other two editions, lastly the seat is flat and has a different fixing to the seat than the later 2 editions. This edition comes with a 12inch rear wheel however the tyre is solid rubber as opposed to having an innertube that holds air. This frame shape is able to accommodate a 16inch wheel if you are looking to experiment or you can switch it out to a normal 12inch coaster brake wheel with an innertube. Overall I would advise not buying this type of Max skatebike unless it is in very good condition, I say this as spare parts for this edition can be troublesome to locate as I found out after a reputable indie bike shop advised me that the bottom bracket could not be replaced as the parts for that size shell were no longer produced and advised getting a new bottom bracket shell welded on and remove the original. The standard rubber rear wheel is not of the best quality and whilst it could be removed and a hole drilled for an innertube drilled and new tyre fitter this should be considered when thinking of buying.
The black frame is from what I believe to be either second or third edition, the differences when compared to the primer grey frame are clear, the smaller skateboard truck hole spacing on the mounting plate, the larger bottom bracket shell (I believe this to be called a ‘USA sized’ bottom bracket), then finally the chainstay shape is straighter. This edition is not safely able to accept a 16inch wheel however the rear wheel does have an innertube as standard as opposed to the solid rubber predecessor. I prefer this later edition frame as spare parts like the bottom bracket, crank and bearings are easy to source, replacement trucks can be located from auctions sites like ebay by searching for vintage penny boards as they have the same hole spacing to fit the Max. The main difference between the second and third editions is that one had a plastic skateboard truck and wheels (documented elsewhere on the site), as I’m not certain on the dates of production I’m not able to confirm whether the plastic truck edition was second or third however I would suggest avoiding the plastic truck edition as I found the truck was not strong enough and quickly broke when I tried it so it would be best to replace the truck so again would need to be considered when looking to purchase a Max.
In summary when looking for a Max skatebike I would suggest going for a Max that has a metal skateboard truck and an innertube in the rear wheel, checking these two details will save you time and money down the line when looking for parts and customizing. The Max skatebikes that have an innertube and metal skateboard truck do not need to be altered before using, maybe just need skateboard wheels and bearing depending on the level of use it has previously seen.
Jon N. – UK
Mats van der Gugl – Slovenia
Mats van der Gugl has some skatebikes in Slovenia. Here are Instagram posts from him.
I’ve attached a shot from Instagram of a design similar to the Lerun but with a 16inch wheel. Mats said it was a Slovenian bike maker who made it. Looks pretty cool.
Jon N (UK)Jon asked:
@skatebikeuk
Is the red one a Lerun too? I’ve not seen a 16inch wheel Lerun, looks very cool!mats.garage.67
@skatebikeuk No, it’s a “PlayBike”, made in a small Slovenian local bike shop in 80’s. I admit didn’t know for them till I got one in my hands 😉


Steampunk SQRL
Here is an interesting Steampunk SQRL that Jon N (UK) found on Instagram. Hey @rosierockets, amazing paint job.
LeRun Jr.
Jon N from the UK sent me an interesting find, pictures of a LeRun Jr. I did not know a junior model existed. Notice the Jr uses a traditional bicycle seat, unlike the regular model with a unicycle seat.
The LeRun Jr comes from Winson Ooi of Petaling Jaya, Malaysia. He posted these photos on KELAB BASIKAL LAMA, a Facebook bicycle club to share their collections of bicycles owned.


The “thebigfatlittleshoppe” in Singapore is showing this pretty red LeRun Jr.
Garel Monocycle Repaint – Jon N – UK
I purchased the Garel from eBay thinking it was a Lerun skatebike, the previous owner had made some alterations to the front and replaced the original truck with a newer and poorly fitting skateboard truck. The skateboard wheels were dry and cracked with one coming off on the first try riding it, the rear wheel didn’t sit correctly under the frame and the spokes were bent and needed attention. (See part 1)
I took the skateboard truck off and switched it with a Continental skateboard truck that I purchased from eBay mounted on an old Penny board. The hole spacing for the truck to be mounted to the Garel is the same as the Lerun and Max, for finding a replacement I would recommend old Penny boards made by companies like Variflex, Skuda and Super Star if you are on a budget as they can be picked up quite cheaply, alternatively higher end models by companies like Vulcan and ACS-430 also appear to have the correct spacing but always double check with the vendor before you buy it. With the Conti fitted I installed two Deville Whitewalls 70mm / 78A and would highly recommend them to anyone. My attention then turned to the rear wheel whereby I took it to a local bike shop where they managed to true the rim, the next change was to the tyre and switching from an old and degraded one and to a newer whitewall I had taken from elsewhere. I put some washers in place on the rear axle and managed to line up the wheel to be under the frame which in turn would improve the stability. I then switched the quick release seat-post clamp to a fixed one to improve the lines of the design and eliminate the risk of someone pinching the seat if it was locked up outside a shop.
Riding the Garel after these modifications it was clear how the changes vastly improved the riding experience, it is stable and smooth rolling and a pleasure to ride!


Lastly I changed the colour to Chromacoat Peacock (available through Kustom Canz suppliers) as the original green had chipped and rubbed off in various places (I did buy a can of a very similar green before I started just in case it didn’t work out and I wanted back the way it was). There are lots of colours to pick from and I wanted something that would appear as a different colour from different angles and Kustom Canz do a kit of 3 cans consisting of base coat, main colour and the top clearcoat, alternatively you can just go for the main colour if you wish. I removed the truck, rear wheel, chain and seat-post clamp but left the crank arms, pedals and bottom bracket on (it is a Cottered crank and I didn’t want to risk damaging it trying to remove it) and masking taped them to be ready for spraying. I then removed the Garel sticker from the frame and sanded down the frame to ensure it was smooth before applying primer. The primer went on without issue and I checked to see if there were any sections that needed attention before adding a base coat. I gave the primer a light sanding with some 2000 grit paper and a clean down before applying a black base coat in order to help the main colour stand out. I then gave it another quick sanding with 2000 grit again and then went on with the Peacock colour, which like most spraying is better done in multiple lighter coats rather than 2 thick ones. Make sure you are spraying in a very well ventilated area and use a mask as this has a very powerful odour and harmful chemicals, even outdoors wear a mask for it! Once the main colour was dry I applied multiple coats of a clear finish to protect it, once that was dry I reattached the wheels and chain (I had sprayed the seat-post separately).


The Garel rides great and looks even better and is a far cry from how it was when I originally received it, I might change the colour again at some point and go for another variation but I’ll keep it like this over summer as the sun highlights how vibrant it is.
Max Skatebike – Jon N – UK
By Jon N. – UK
I purchased this Max skatebike from Facebook marketplace with the intention of giving it a go and seeing what happens and ended up becoming obsessed with it and making little design changes to it along the way.


I started off by changing the seat-post and seat as the seat-post was too short for me at 250mm long (Changing LeRun/Garel/Max Skatebike Seat/Saddle), once the unicycle seat was installed it made riding it considerably easier and more comfortable.

The next change was to spray the rear wheel black to match the frame and change the overall feel of it. It was a simple case of taking the wheel out and removing the tyre and tube then masking off the metal sections to leave only the yellow plastic visible and then spray. I would advise using a primer first and then your colour and then a protective clear coat on top, I went straight for black without a primer and didn’t put a clear coat on after and it has come away in a couple of small sections so will probably need a respray at some point.
Once the spraying was done the next change was to the tyre and I installed a Kenda ‘whitewall’ tyre, to me the colour contrast works really well and matches the seat colouring. The tread on the whitewall is aimed more at roads as opposed the original tyre that had a deeper tread pattern aimed at muddier terrain. The width of the Kenda is slightly less than the original but this does not negatively affect the riding experience.

The seat post clamp was then switched to a fixed clamp rather than a quick release, this aspect is also covered further in the article on changing the seat. The chain that was on there originally had seen better days so I thought why not get a gold chain for it? As a further little touch I bought four dice valve covers and added one to keep it colour coordinated. I also sprayed the crank arms and sprocket black as the chrome would have stood out. I had also changed the truck bushings to 94A by this point to aid the turning ability.
Lastly were the front wheels, originally it had Kryptonics 70mm installed (not sure of the firmness rating), these were great for different road surfaces and small pebbles and sticks but were not in keeping with the colour scheme and I wanted to go for something at the soft end of the scale to see if there was a difference. I opted for Deville Whitewalls 70mm and 78A rating and they are fantastic! They feel very smooth out on roads and paving slabs and wonderful on smoother surfaces.


In terms of how the impact of the changes in functional terms the largest would be changing the seat-post and the bushings and the front wheels, the aesthetic colour changes influenced how I saw the skatebike and allowed me to put my mark on it.
The Max rides fantastically and whilst it looks very different to how it arrived it has developed into something I am very proud of and I hope it inspires people and shows what is possible with a little TLC.
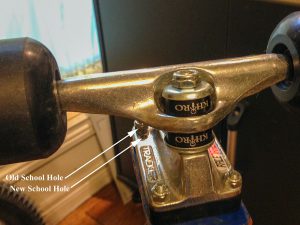
AXL Skateboard Truck Details
Minson skatebikes use standard “Old School” skateboard truck hole pattern.
-

- Old vs New School Holes. Minson uses old school. LeRun is much smaller

-
- Old vs New School Holes and new bushings

Garel, LeRun and Max skatebikes use a smaller pattern
-

- 1 1/4″ (1.25) short holes

-

- 1 5/8″ (1.625) long holes

AXL skatebikes use a third hole pattern
-

- 1 15/16″ length (1.9375)

-

- 1 15/16″ length (1.9375)

-

- 1 5/16″ width (1.3125)

-

- 1 5/16″ width (1.3125)

AXL trucks are plastic rather than cast aluminum like the other skatebikes.
-

- AXL Plastic Truck

-

- AXL Plastic Truck

This is an AXL skatebike that Jon N from the UK bought. One of the wheels came apart on his first ride. Because the hole pattern is so small he could not fit any of the old skateboard trucks. The axel hanger from an old 70’s Continental skateboard truck fit.
-

- Conti truck would not fit

-

- But Conti truck axle fit on original base

May 19, 2021 update
Jon also found this old Tony Hawk skateboard in second hand shop. The holes are very close and for not much money he got 2 trucks, 4 wheels and 8 bearings.


Changing LeRun/Garel/Max Skatebike Seat (Saddle)
Jon N. from the UK wrote this article about changing the seat on his Max Skatebike to a unicycle seat. My personal skatebike is a Minson which uses a traditional seat post and seat. The Garel/LeRun/Max skatebikes use a unicycle like seat connection.
BTW: A unicycle seat is often referred to as a unicycle saddle.
Rich
-

- Max Skatebike with new unicycle seat

-

- Original LeRun

-

- Original vs Unicycle Seat

-

- Original Seat

-

- Original Seat Bottom

-

- Unicycle Seat Bottom

-

- Unicycle Seat width

-

- Unicycle Seat Length

-

- Adjustable Clamp

-

- Fixed Seat Post Clamp

The skatebikes used in the photos are a black Max skatebike and a blue LeRun, the LeRun and the original Max seat are the same design and are shown for comparison purposes. When I purchased my Max skatebike from eBay the seat post was too short for me to ride in a comfortable position. The post was 250mm long which once you’ve taken into account the section required to go into the frame it did not leave a lot the space required for a person just over 6 foot tall like myself. I had hoped to simply replace the seat post with a longer one and all would be fine, however when I examined the fixing of the post to the seat I realised the seat itself had 3 shafts for nuts and were positioned in a triangular shape. I searched online and couldn’t find a replacement seat post that had triangular hole positioning so I decided to replace the seat too. The fixings on most bicycle seat posts are designed to work at an angle and for a skatebike it needs to be straight up which is how I arrived at a unicycle seat and post.
I used unicycle.com who had a good selection of seats and posts along with other supplies. The seat post width for my Max is 25.4mm (Lerun and Garel models use 25mm), I went for a 350mm long post and a zebra print seat for a total of £30. There are other colour variations out there but as soon as I saw this I knew it was the one for me! As you can see there are differences in the designs of the original seat and the unicycle seat, namely the width is reduced on the unicycle seat and the curve angle is increased on this ‘freestyle’ seat (flat unicycle seats are available on the website too). The unicycle seat is firmer than the original from the Max and is fixed to the seat post via 4 shafts in a rectangular formation and allows for tweaks on the angle of the seat rather than the fixed position of the original seat. The grab section at the front (there is also a grab section at the rear of the unicycle seat) is incorporated into the seat design rather than the ring design of the original, this can take a little getting used to at first if you’ve been using a ring for a long time. When I first put the unicycle seat on and went out on it I really noticed the width difference compared to the original and was concerned that it would take something away from the comfort aspect however I found it is easier to understand where my body weight is in terms of positioning. The original seat is wider and in comparison feels almost too wide for me now and there’s less clarity in knowing where your centre of gravity is, however the original is more comfortable and has more of a shallow sideways C profile. From a top down view the unicycle seat is an hourglass shape which helps position the rider and the original is a teardrop shape. I would suggest trying one out in a shop if you can, I’m average build and a unicycle seat may not be comfortable for everyone.
Out of the two seats I would say I prefer the unicycle seat as I find it better for comfort, response and firmness. The original seat works as a seat but there are other options out there and it might change how you feel on a skatebike and grow your confidence to try more moves or go for longer distances so why not give it a try?
Another change I made to the Max was to the seat post clamp and removing the quick release system. I decided a fixed seat post clamp would be better for me for when I lock it up outside a shop I don’t have to worry someone can pinch the seat, plus it looks slicker to me and matches in terms of colour. It was a simple case of taking off the quick release fitting and popping the fixed seat clamp post (I sprayed it black as it was chrome – 28.6mm seat post clamp for Max/Lerun/Garel) and tightening it accordingly.
Jon N. – UK
LeRun Skatebike
![]()
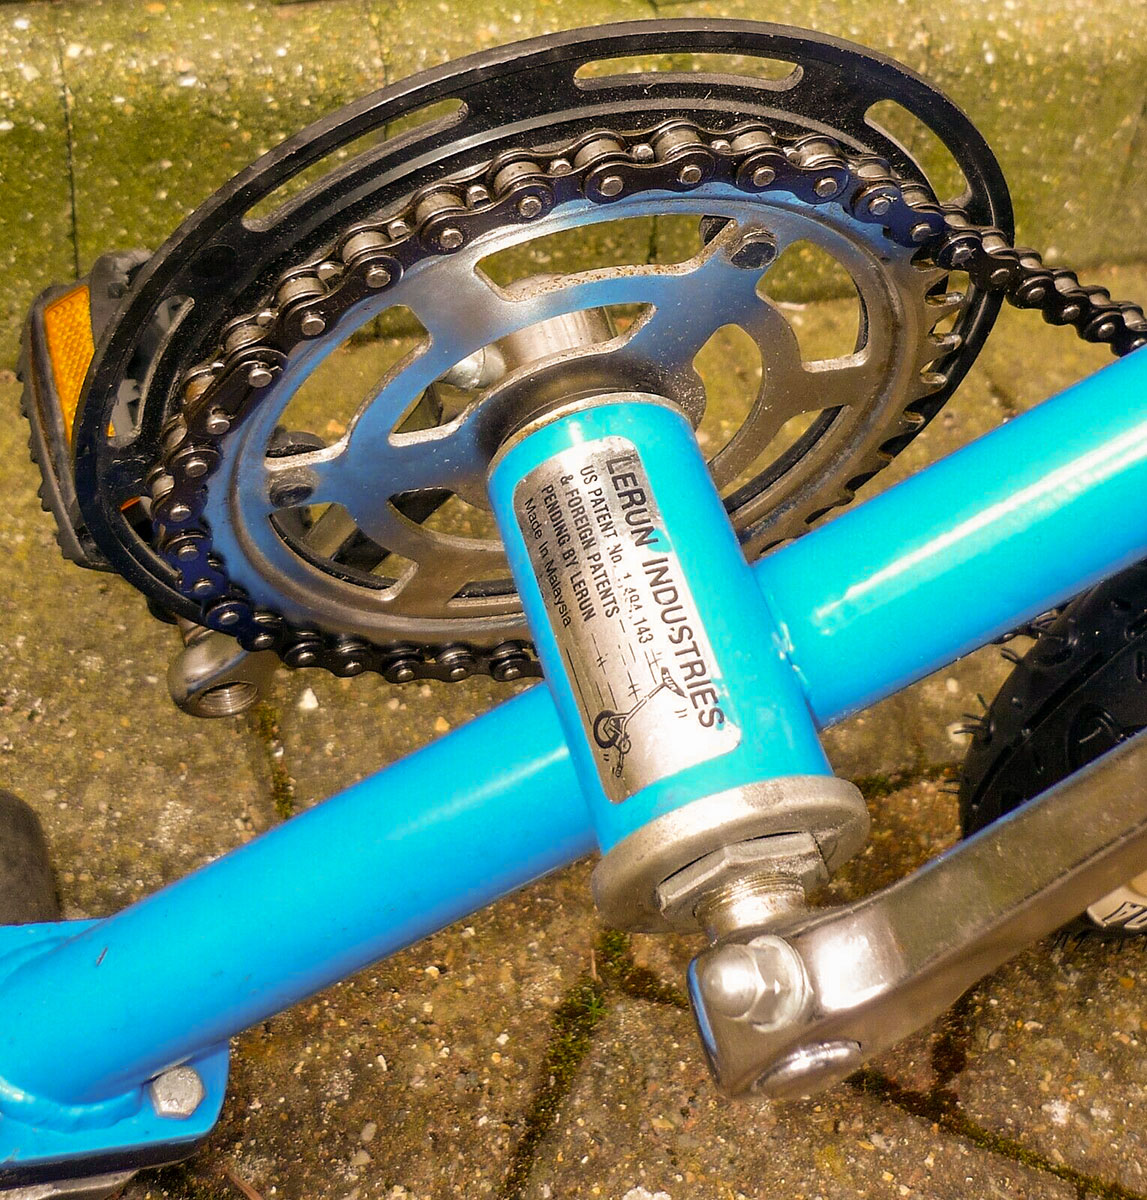
The LeRun (French for The Run) skatebike was made in Malaysia by LeRun Industries. facebook.com/lerunmalaysia/
Lerun began its operations back in the 1970s, pioneering the manufacturing of mountain bikes for the local market. Lerun’s ‘claim to fame’ is the Skatebike – the one-wheel unicycle which was launched back in the late 80s. The introduction of the Skatebike created a cult following amongst youngsters and henceforth catapulted the Lerun Unicycle up to the top of every kid’s wish list. Since then, the Lerun brand has become a household name.
Headquartered at Puchong, Selangor, the Lerun head office controls all distribution and sales operations for its diverse portfolio of bicycles. The product range that is offered includes MTB, BMX, Tandem Bike, Folding Bike, City Bike and Racing Bikes with wheel sizes ranging from 16 inches to 26 inches, which are marketed under the popular “Lerun” and “Polygon” brands.
A pristine LeRun before the MTV branding.